
How to Cut a Hair Mineral Sample in 4 Easy Steps
The hair sampling procedure is very important for accurate Hair Tissue Mineral Analysis (HTMA) readings - sending in a high-quality sample cannot be over-emphasised.
However, many people often ask us how to cut a Hair Tissue Mineral Analysis properly.
Ideally, collection of the hair sample should be done under professional supervision, or by someone trained in proper collection procedures within a clean environment.

Below are the four steps for the best way to cut a hair sample for the most accurate results.
Please be sure to read the whole document prior to cutting your hair!
WITH A HAIR KIT
The kit that you receive includes:
An order form, which doubles as an envelope to send your sample to the lab.
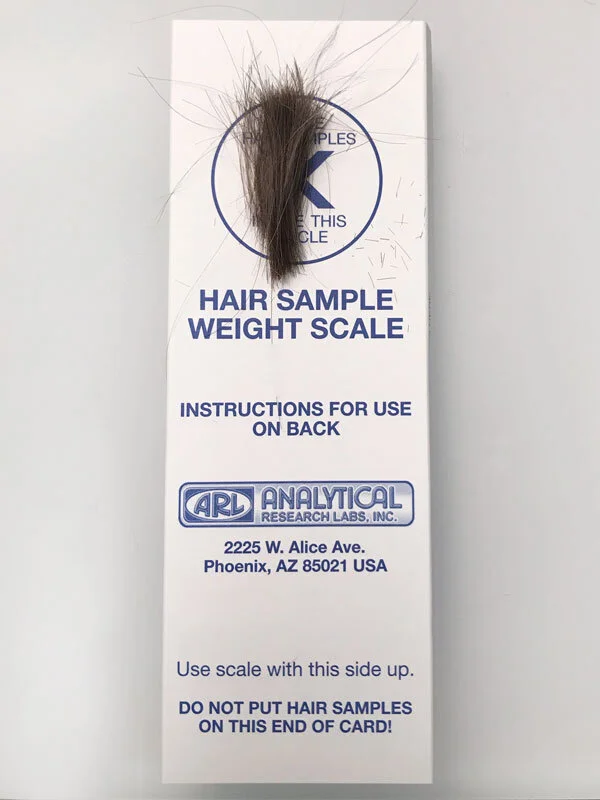
A “balance” for measuring the right weight for your hair sample.
A small envelope for your hair sample to go into.
You will need your own Stainless Steel Scissors.
WITHOUT A HAIR KIT
To provide a hair sample without a kit, you will need:
2 X Paper Envelopes:
A paper envelope to send your sample to the lab.
A new and clean paper envelope for your hair sample to go into.
This can be as simple as a piece of paper that is folded.
It must be made of paper!
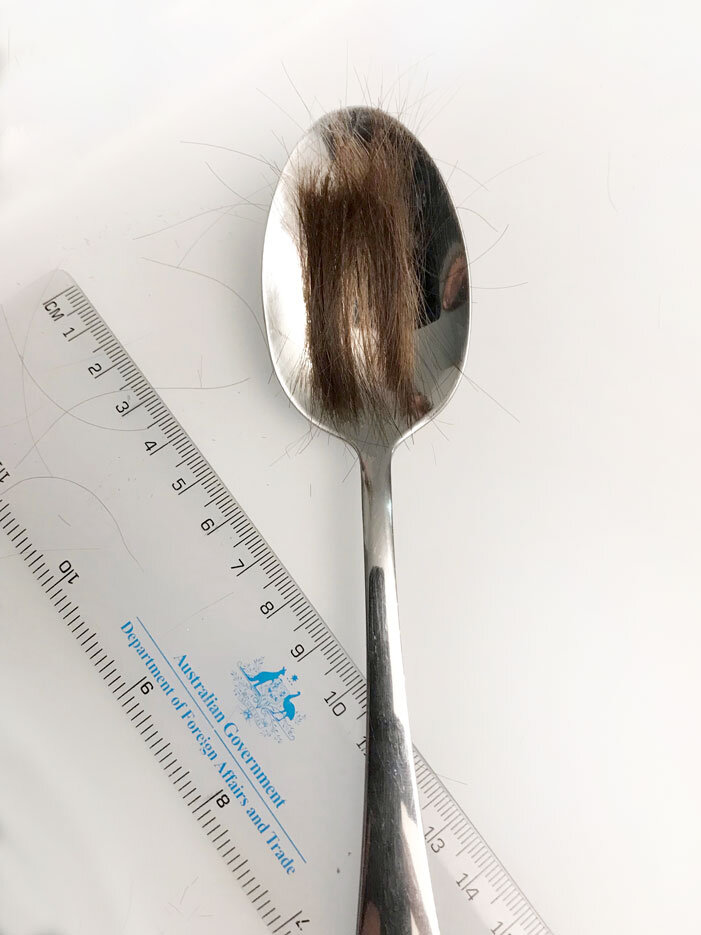
A tablespoon spoon or small digital scale to measure your hair sample.
Stainless Steel Scissors.
The Order Form which is included in your purchase email.
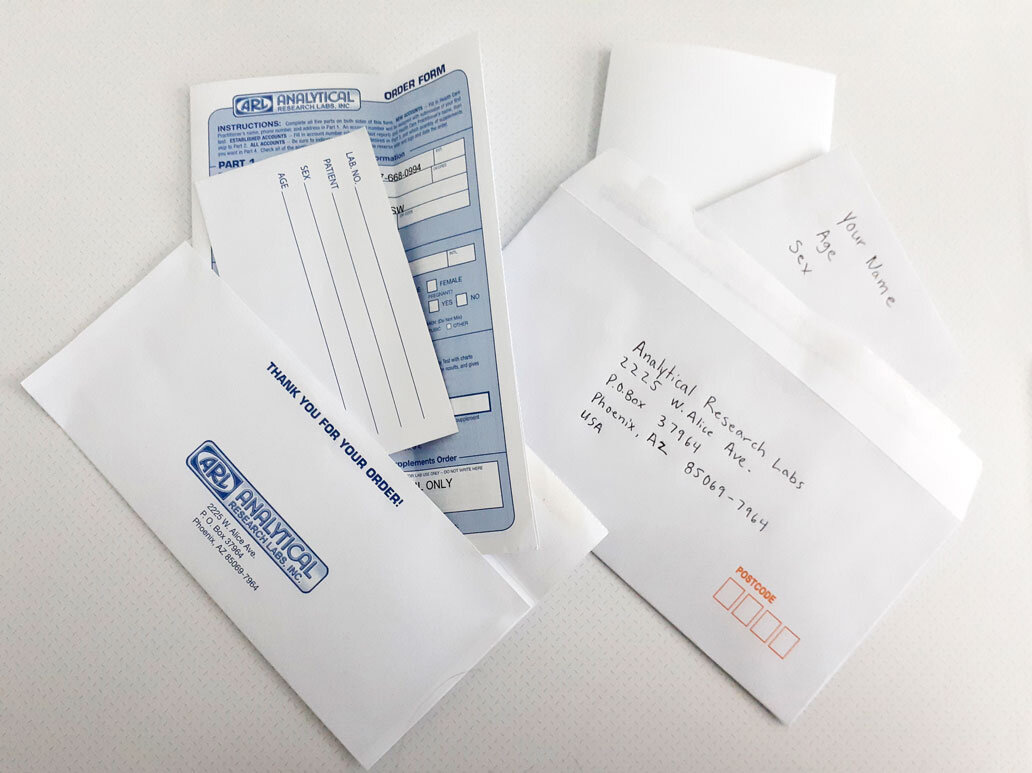
The following guidelines should be maintained to ensure the collection of a metabolically representative sample and to avoid the introduction of external contaminants prior to, during and following the collection process.
Note: The only hair source that we recommend for analysis is scalp hair. The reason is that the hair does not grow as quickly and the normal reference ranges were not assigned for areas from various regions of the body, and only for the scalp. We only recommend using other sources of hair for the confirmation of elevated toxic metals that have been found in the scalp hair and/or to rule out external contamination of the scalp hair. If you need to provide a sample for other-than-head, please see below for instructions.
1. Prepare your Sample
We only use a lab which does not wash the hair sample that they receive.
On the day that you plan on taking the sample:
Wash your hair with a simple shampoo to avoid possible environmental contamination.
Do NOT use any Shampoo that contains:
Zinc (eg Heads and Shoulders, Anti-dandruff Shampoo)
Selenium (eg Selsum Blue)
Lead (found in Colour Darkening shampoo/cream eg Grecian Formula, Restoria)
Manganese
Apple Cider Vinegar (too harsh and can affect extracellular mineral levels)
Or any other mineral as this may skew the results.
Most shampoos are suitable - please check the ingredients.
Please avoid using conditioners or other products on your hair after you wash it.
The hair should also be free of all gels, oils and hair creams prior to sample collection.
If your home has a water softener or it still has hard water, before sampling hair you must shampoo it twice with either unsoftened tap water, or preferably reverse osmosis/distilled water from the supermarket.
Do not sending dirty, sweaty or greasy hair. This will not produce results that are accurate to your body chemistry.
The portion of hair to be collected should be untreated.
This means that the sample can NOT be permed, dyed* or bleached. If all of the hair has been chemically treated, wait at least 6 - 8 weeks until sufficient new virgin growth has emerged for collection.*We have found that most dyes these days do not contain the heavy metals that they used to, and it may still be fine to supply a sample - please contact your practitioner for more information.
If you are exposed environmentally and/or occupationally to external contaminants, such as welding, mining, etc, special care should be taken to limit exposure between the time from of washing the hair and the collection of the hair for analysis.
Hair samples must be taken from dry clean hair, between 4 - 12 hours after washing your hair, as ensure that the hair is not only clean but also to allow the natural oils in your hair to return.
2. Cut the hair sample
It is always recommended to have someone else cut your hair sample for you. Ask a friend or the person who regularly cuts your hair.
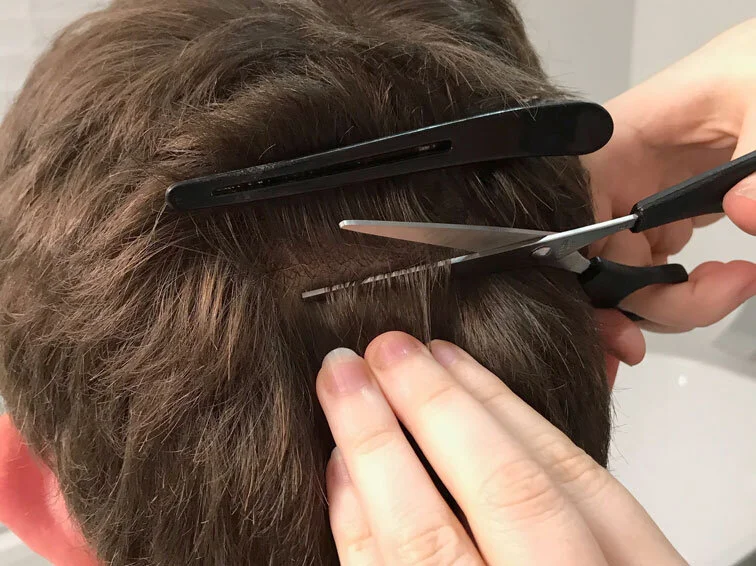
Fig. 1
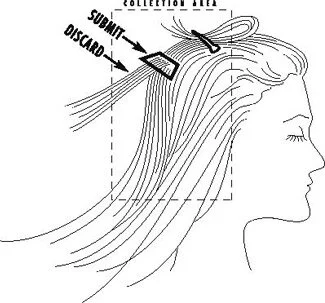
Fig. 2
Use high-grade stainless-steel scissors or thinning shears.
Take the hair sample from as close to the scalp as possible. See Fig. 1
Most samples are taken from the nape of the Neck or from the base of the skull, however anywhere on the head is acceptable. (More info below)
Cut in thin lines from various locations of the scalp, to avoid obvious bald spots.
For Shaved Head: If you shave your head, then cut with a clean electric razor* or disposable razor, what you can and save it in a paper envelope. The next week or so, razor cut it again and repeat until you fill a tablespoon with hair or tip the scale if you have a paper scale to weigh hair.
*Please note that Electric razors have been known to cause contamination from either excess oil in the moving parts or from small pieces of metal being shaved off during movement. Please inform your practitioner that you are using this method so they can take note.
Next, cut off any hair that exceeds 1 inch (about 2 cm) long and retain the sample closest to the root. See Fig. 2
This portion reflects the most recent activity, ie 1 Month = Approx. 1 cm or 1/2” of hair growth.)
The length of the collected hair should not exceed one and one-half inches (4cm). Fig. 3
The recommended areas for collection are the nape of the neck, posterior vertex and posterior temporal regions. (See Fig 2, above.)
Weigh With Kit:
Place cut hair together on the scale - when the scale tips, you have provided enough hair for the lab to perform the Hair Tissue Mineral Analysis.
The lab requires 125 mg of hair, but it’s recommended to provide about 250 mg. If you have a paper scale, it must tip for you to have enough.
Measure Without Kit:
Visual Estimate:
Collect at least 1 full tablespoon (15 mL) of hair, moderately packed — not loose, but not compressed. This typically provides around 200–250 mg of hair, giving a safe margin for most clients.
→ If you're in Australia, your standard tablespoon is 20 mL — this slightly overshoots, which is perfectly fine.Weighed Amount (Preferred):
Use a small digital scale to collect approximately 250 mg of hair.
→ The lab requires a minimum of 125 mg, so this provides a buffer in case a portion needs to be reanalysed.
3. Place the collected hair sample into a small envelope and post to the Lab.
With Kit:
Before placing the collected sample into the clean hair specimen envelope, please write your name, sex and age on the indicated areas. It is advised to also write your email address on this incase you forget to include the order form.
After this, place the hair sample into the small white envelope provided and seal the glue flap.
Then place this sample envelope along with the completed Order Form into the Address envelope.
Without Kit:
Write your name, sex and age on a new and clean paper envelope.
Then place place the collected sample into it, seal it, and fold the envelope in half.
Place in another envelope for mailing with the order form that is provided for you in your Client Portal.
Do not send hair in plastic bags or aluminium foil.
Please do not use any of these things to seal, secure or wrap the hair envelope and/or the hair specimen contained within:
staples
tissue
paper clips
adhesive tape
aluminium foil
other metal and paper material of any kind
When you have obtained a hair sample from the instructions above, please post your sample directly to the lab as stated by your practitioner.
Most labs have a 2-4 working day turn-around once the results reach the lab. This includes emailing the sample to the practitioner.
Please consider your postage options when posting to the lab - postage is much slower than it used to be prior to covid, especially in countries outside the United States. It may be worth sending your sample via express or courier, as the wait time on overseas samples is approximately 2.5 - 4 weeks.
Other information
-
This should only be used as a last resort - ultimately all of the current science is based on Head Hair Samples.
Please contact us ASAP to discuss your options. Do not send in a sample that is other than Head Hair, without informing us first.
If you have a serious medical condition and cannot use head hair, these are the options:
The first choice for men is beard hair.
If this is unavailable, the next best location for sampling hair is the underarms (unless you use a aluminium-based deodorant).
Body hair can also be used, if available, though this is not recommended.
Please avoid using Pubic hair, as while it is allowed by many labs, is not as accurate.
Avoid combining hair from different parts of the body in one hair envelope - one location of hair must be taken per sample.
The other option for those unable to provide head hair samples is Fingernails or Toenails, although we do not actively work with them. If you wish to request this option, we will have to send it to a different Testing facility - please contact us for details.
-
All reference range correlations, dietary recommendations and interpretive report content assumes that the complete hair specimen originated solely from the above defined regions of the scalp. Hair grows on average 1cm per month. Thus, a 2cm sample will provide data from the previous 2-months. If you were to provide a sample of 1cm long, you would be looking at approximately 1-month in the past.
Do not send in long hair samples. If you send in long hair, you will be sending in “old” information. This will not provide an accurate reading of your current metabolic state. However, the hair samples can be shorter, that suggested above. Actually, the shorter, the better. This means they will be more up-to-date.
-
If the hair sample will be cut by your hair stylist, hair dresser, or barber, make sure to give them these instructions. Many stylists cut off the ends of long hair, which is incorrect and this will not give accurate results.
-
Do not use medicated shampoos prior to sampling your hair for analysis. This means at least two hair-washes before taking your sample.
These include: Selsun Blue, Heads N’ Shoulders, Grecian Formula or other brands which include minerals like zinc and magnesium. -
Some hair dyes affect the hair test, therefore ideally, take a hair sample before dying your hair.
If you want to dye your hair, consider leaving a section of hair un-dyed, in the bottom layers of your hair. We recommend using only a natural hair dye.
-
These treatments alter the structure of the hair somewhat. Sample the hair before a treatment, or wash the hair three or more times after a bleach or permanent treatment before sampling the hair.
-
A newer recommendation is to cut the hair sample from the head, or as close to the head as possible. This will give more accurate readings. It is different from the recommendations of Analytical Research Labs.
With animal hair, before cutting the hair sample, clean the area with a clean piece of cloth or rag and some rubbing alcohol. This is better than cleaning the fur with water or soap. Once the sample is cut, do not wash the sample in any way, as that can skew the readings. Cut the sample as close as possible to the skin, and throw away any hair or fur that is more than about 2 centimetres long.
To take a horse sample, cut from the lower section of the mane. Take from a similar area for a canine or feline sample. Take sections from above and below the collar, avoiding any area that topical treatments have been applied.
With animals, you must tell the laboratory the species of animal and notify your practitioner that this sample is for an animal. You can test dogs, cats and horses (equine) and perhaps others.